Setting Up HDMI TFT Display for Raspberry Pi or Arduino
If you're diving into the world of DIY electronics, an HDMI TFT display can be a game-changer. Whether you're working on a Raspberry Pi project, an Arduino build, or any other embedded system, these compact and versatile displays are perfect for creating portable, high-resolution interfaces. In this step-by-step guide, we'll walk you through setting up your HDMI TFT display with both a Raspberry Pi and an Arduino, so you can bring your projects to life.
What You will Need?
Before we get started, make sure you have the following components:
- HDMI TFT Display : Ensure it supports HDMI input (e.g., LMT070DAMFWA-NFD 7-inch TFT LCD with capacitive touch).
- Raspberry Pi or Arduino board.
- Micro-HDMI or HDMI Cable : Depending on your hardware.
- Power Supply : For both the display and the microcontroller.
- SD Card (for Raspberry Pi): Preloaded with an operating system like Raspberry Pi OS.
- USB-to-TTL Serial Adapter (optional, for Arduino).
- Jumper Wires (if needed for Arduino setup).
Step 1: Understand Your HDMI TFT Display
Before connecting anything, take a moment to familiarize yourself with your display:
- Check the resolution, for example LMT070DAMFWA-NFD has the resolution of 1024x600. And ensure it’s compatible with your Raspberry Pi or Arduino.
- Verify whether the display requires additional drivers or configurations.
- Confirm the type of HDMI port (full-size or micro-HDMI).
- Most modern HDMI TFT displays are plug-and-play, but some may need specific adjustments in software settings.
Step 2: Setting Up with Raspberry Pi
2.1 Connect the Display
1. Power off your Raspberry Pi to avoid any electrical issues.
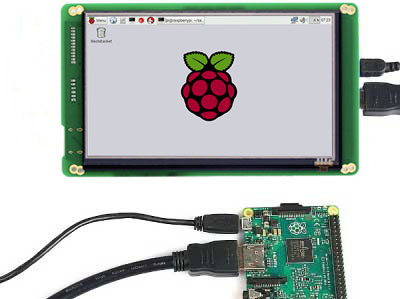
2. Use an HDMI cable to connect the Raspberry Pi to the HDMI TFT display.
3. Plug in the power supply for both the display and the Raspberry Pi.

2.2 Configure the Raspberry Pi OS
1. Boot up your Raspberry Pi. If it’s a fresh install, log in using the default credentials (username: pi, password: raspberry).
2. Open the terminal and run the following command to configure display settings: "sudo raspi-config"
3. Navigate to Advanced Options > Resolution and select the resolution that matches your HDMI TFT display.
4. Reboot the Raspberry Pi: "sudo reboot"
2.3 Test the Display
Once the Pi reboots, the desktop environment should appear on the HDMI TFT display. If the screen is blank or distorted, double-check the resolution settings or consult the display’s manual for troubleshooting tips.
This is a more detail explanation on connecting Raspberry Pi with HDMI TFT LCD.
Step 3: Setting Up with Arduino
Setting up an HDMI TFT display with an Arduino is slightly more complex because most Arduino boards don’t have native HDMI output. However, you can use an HDMI shield or a USB-to-TTL serial adapter to bridge the connection.
3.1 Hardware Setup
1. Connect the USB-to-TTL serial adapter to your Arduino board using jumper wires:
- TX (Transmit) on the adapter connects to RX (Receive) on the Arduino.
- RX on the adapter connects to TX on the Arduino.
- GND (Ground) connects to GND on both devices.
2. Connect the HDMI TFT display to the USB-to-TTL adapter using an HDMI cable.
3.2 Install Required Libraries
To communicate with the display, you’ll need the appropriate libraries. For example:
- Install the UTFT library for Arduino by downloading it from GitHub or via the Arduino Library Manager.
- Include the library in your sketch: "include <UTFT.h>"
3.3 Upload Code to Arduino
Here’s a simple example code to test the display:
#include <UTFT.h>
// Initialize the display (adjust parameters based on your model)
UTFT myDisplay(ITDB32S, 38, 39, 40, 41);
void setup() {
myDisplay.InitLCD();
myDisplay.clrScr(); // Clear the screen
myDisplay.setColor(255, 255, 255); // Set text color to white
myDisplay.print("Hello, HDMI TFT!", CENTER, 100); // Print text
}
void loop() {
// Nothing to do here
}
Upload the code to your Arduino and observe the display. If everything is connected correctly, you should see "Hello, HDMI TFT!" displayed on the screen.
Step 4: Troubleshooting Common Issues
Even with careful setup, things might not work perfectly on the first try. Here are some common problems and solutions:
No Signal on Display : Ensure all cables are securely connected and that the power supply is adequate.
Incorrect Resolution : Double-check the resolution settings in Raspberry Pi or adjust the library configuration for Arduino.
Blank Screen on Arduino : Verify that the correct pins are used for communication and that the library matches your display model.
Step 5: Take Your Projects Further
Now that your HDMI TFT display is up and running, the possibilities are endless! Here are a few ideas to inspire you:
Build a portable media center.
Create a custom dashboard for IoT applications.
Develop a retro gaming console.
Design a smart home control panel.
Build a portable oscilloscope or data logger.
Create an interactive art installation.
Conclusion
Setting up an HDMI TFT display with a Raspberry Pi or Arduino is easier than it seems, and the results are incredibly rewarding. With this tutorial, you now have the knowledge to integrate these displays into your projects and unleash their full potential. Whether you’re a hobbyist or a professional, the combination of HDMI TFT technology and microcontrollers opens up a world of creative opportunities.
Got questions or need help with your setup? Send us an email — we’d love to hear about your projects!
